What Is an Equatorial Mount?
The days of holding a telescope up to your eye are long gone, and, nowadays, if you want to use a telescope you’ll need to have it on a mount. The primary purpose of the mount is to provide some stability, but it should also serve to make it easier to locate and track celestial objects.
As you shop around, you’ll notice there are primarily two types of mount for your telescope – altazimuth mounts and equatorial mounts. So what’s the difference?
An altazimuth mount allows you to move your telescope in a simple left-right, up-down motion. This makes it very easy to use, but it has one major drawback: unless it’s computer-driven, it’s unable to track objects in the sky as they rise and set.
That’s because objects in the sky don’t rise and set in a left-right, up-down motion – they rise and set at an angle in relation to the horizon. The exact angle will depend upon your latitude; for example, observers on the equator will see objects rising above the horizon at a ninety degree angle, while observers at a latitude of 45 degrees north or south will see objects rising at a 45 degree angle.
Observers at the poles don’t see objects rise or set at all, but rather they appear to spin about the celestial pole. There’s no bright star to mark the southern celestial pole, but at the north pole, the stars, Moon and planets would appear to rotate about Polaris.

The problem with altazimuth mounts is that, while they’re very easy to use, you have to constantly re-adjust the telescope to keep your target in the field of view.
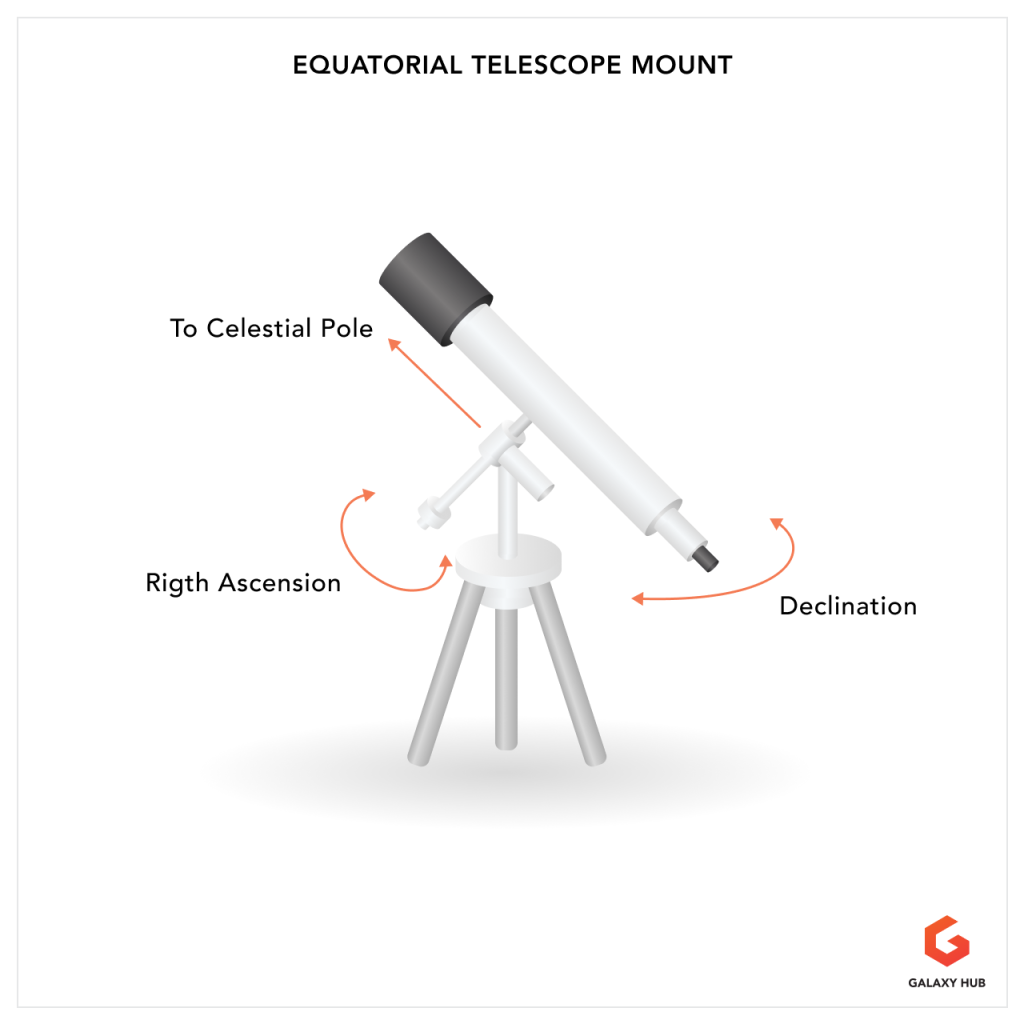
An equatorial mount works differently; it tilts the telescope to match the angle of your target’s path. You might still need to track it horizontally, by turning the telescope to the left or right, but after you’ve initially found your target, there’s no vertical adjustment to be made.
The mount itself consists of two axes; a right ascension (R.A.) axis and a declination (Dec) axis. Right ascension and declination refer to the position of an object in the night sky and work in a similar way to latitude (declination) and longitude (right ascension) on Earth.
If you know the R.A. and Dec of an object, you can use the axes of the mount to locate and track your targets. Alternatively, a GoTo computerized telescope can suggest, locate and track a target automatically. Not only is this convenient, but it can also save you a lot of time – a valuable commodity, especially when it comes to astrophotography.

Altazimuth vs Equatorial – Which is Better?
Deciding which mount is best for you may depend on what you want to do with it, as there are pros and cons to both.
| Altazimuth | Equatorial | |
| Ease of Setup | Very easy. The telescope is attached to the mount and you’re good to go. | The telescope and mount must be properly balanced and aligned with the celestial pole. |
| Ease of Use | Easy to use as the telescope simply moves in a left/right and up/down motion. | Can be a little confusing, as the telescope turns to follow the target’s path across the sky. |
| Tracking | Can be tricky without electronics, as the scope must otherwise be manually moved to keep the target in view. | Easy; since the mount is designed to follow the target, you only need to turn the telescope to the left or right. |
| Weight | Varies, depending on the aperture of the telescope and the mount, but often lighter than an equatorial mount. | Since equatorial mounts require counter-weights, they are typically heavier than their altazimuth counterparts. |
| Portability | As altazinuths are typically lighter and require less setup time, they’re usually more portable than equatorials. | Due to the need for counter-weights and setup, equatorials can lack the portability of an altazimuth. |
| Functionality | Can be limited to the telescope, finder and small camera. Astrophotography is possible with a GoTo, but may not produce the best results. | Very versatile as the mount can potentially support more than one telescope, plus photography equipment. Motorized mounts are excellent for astrophotography. |
If you’re a beginner who’s new to astronomy, or maybe even someone who’s looking to move up from naked-eye or binocular astronomy, then an altazimuth scope might be the better choice. (You can read more about them in our guide.)
If, on the other hand, you’re familiar with telescopes or you want to seriously pursue astrophotography, then an equatorial mount is the way to go. Its superior tracking and higher payload capacity make it the better choice for capturing stunning images of the cosmos.

The Different Types of Equatorial Mount
There have been a number of different equatorial mounts over the years, but only a few are in common usage by amateurs.
However, before we get into the details, let’s consider the differences between manual, motorized and electronic mounts.
As the name implies, a manual equatorial mount requires you to constantly move the telescope yourself. With a motorized scope, you’ll need to find your target yourself, but then the motorized mount will move the scope and track it for you. An electronic (or “GoTo”) mount will find your target and track it for you. If you want to try your hand at astrophotography, the long exposure times mean you must have either a motorized or electronic mount.
The following is a brief outline of the types of mount you’re most likely to encounter. Each of them could be manual, motorized or electronic.
- German Equatorial Mounts: The traditional German equatorial mount (GEM) uses weights to counter-balance your equipment. This is, by far, the most commmon type of equatorial mount.
- Center-balanced Equatorial Mounts: A relatively new design, center-balanced equatorial mounts (CEM) places the weight of the equipment at the center of the mount, right above the tripod. This provides greater stability for your setup.
- Camera-tracking Equatorial Mounts: A camera tracking equatorial mount is exactly that – a smaller, more lightweight mount that’s specifically designed for camera equipment and, potentially, small telescopes.

How to Choose a Good Equatorial Mount
So you’ve decided that an equatorial mount is the right choice for you. Now you’ll need to do a little research to find the perfect mount for your equipment. Whether you’re looking to get into astrophotography or simply a little visual observing, there are a few things you’ll need to consider.
Seek Advice
Anytime you’re looking to make a purchase, it’s always a good idea to seek advice – and that’s especially true when you could be investing a large amount of money. With that in mind, it’s worth reading the reviews online, both on Amazon and also the websites of equipment retailers, such as High Point Scientific and OPT Corp.
Beyond that, join an online Facebook group or forum (such as Cloudy Nights). There are always people who are willing and able to answer your questions and to help wherever they can.
However, the best option is to join a local astronomical club or society. Not only will you meet and get to know fellow amateur astronomers, but you might have the opportunity to try new equipment before you part with your money.
Consider the Weight of Your Equipment
Just as it’s always a good idea to seek advice (regardless of the mount you’re purchasing), it’s also a good idea to consider the weight of your equipment. More specifically, can the mount handle your equipment?
Try to future-proof it too – you might not be considering astrophotography now, but if you think it’s something you might try later, you’ll want a mount that’s capable of supporting not only your scope, but also your camera equipment.
Related to this is the weight of the tripod itself. While a lighter tripod will make your setup more portable, it will also provide less stability than a heavier one, so be sure to buy a tripod that has the strength you need.
Does it Have a Built-In Polar Scope?
Polar scopes are an accessory that are sometimes built-in to an equatorial mount. For general visual astronomy, this isn’t a necessity, but if you want to dive into astrophotography, then a polar scope is essential.
It allows you to more accurately align your scope with the pole star, which, in turn, allows the scope to more accurately track your target. (If your mount is missing this accessory, they’re relatively inexpensive and you can always buy one later.)
Look for a Dual Axis Motor
A standard motorized drive will turn the scope around its R.A. axis (left to right) and allow you to track objects across the sky. This is fine for visual astronomy, but once again, if you want to get into astrophotography, you’ll need something a little better.
This is where a dual axis motor comes in. Not only will it turn the telescope around its R.A. axis, but also around its Declination axis. This allows the motor to more accurately (and smoothly) track your target as it rises and sets – with better quality images as a result.

How to Balance an Equatorial Mount
Most beginners will opt for altazimuth mounts as they’re typically much easier to setup and use, but that shouldn’t deter anyone from taking the plunge with an equatorial – especially if you plan on learning astrophotography.
One of the challenges facing newcomers is balancing and polar aligning your scope. Unless your scope is in a permanent location (for example, a backyard observatory) the chances are you’ll need to perform these steps before each session. Fortunately, with a little practice, they’ll soon become second nature.
Balancing your scope is important as it will allow your mount to accurately track your targets across the night sky. This is especially important if you’re planning an astroimaging session, as you won’t get any clear images if your target can’t be properly tracked.
- Attach the weights before your equipment. The counterweights are there to properly balance the weight of your equipment; without them, your scope (and anything else you might have attached) could easily swing around and cause some serious damage!
- Next, attach all the equipment you intend to use, including any accessories. The idea here is to have the telescope set up in the configuration it will be used. If, for example, you want to visually observe and then do some astroimaging you’ll need to first balance your equipment without the camera gear, observe, then add your camera gear and rebalance.
- Extend the focuser and remove any caps you might have. If you’re observing visually, be sure to insert the eyepiece you think you might be using the most, or an eyepiece that has a fairly average weight.
- Make sure all your equipment is secure before you do anything else! You’re about to tilt the assemblage over, and the last thing you want is your equipment and/or accessories dropping off!
- Tilt your equipment so that the weights and your assembled equipment are horizontal and level with the ground. Be sure to do this slowly and gently, and to support your equipment with your hand as you do so.
- Try to get a feel for the balance – does one side feel like it’s dropping to the side? If so, move the weights until it feels as though the weights and the equipment are equally balanced. If everything is balanced correctly, you should be able to let go of your equipment and it will stay level with the ground.
- Lock the right ascension clutch and securely hold your equipment before then unlocking the declination axis. If your equipment tips toward the front or back you’ll need to move your equipment and the dovetail forwards or backwards.
Once balanced correctly, you should be able to move your equipment into any position and have it remain in place without any play or movement.

How Do You Polar Align an Equatorial Mount?
Besides balancing your mount, you’ll also need to tilt your scope at the proper angle for your latitude. This means you’ll need to align it with Polaris in the northern hemisphere, or Sigma Octantis in the southern hemisphere.
For general visual observations (and, potentially, very short exposure photography), this doesn’t need to be precise and is fairly easily done.
- Since we’re aligning with the celestial pole, you’ll need to make sure the declination setting circle is set to 90 degrees.
- Make sure your telescope’s tube is in alignment with the RA axis of the mount with the counterweights pointing down toward the ground. One easy way to do this is to align the weights with a tripod leg.
- Turn the tripod so that the RA axis (and the telescope as a whole) is facing north in the northern hemisphere, or south in the southern hemisphere. This doesn’t have to be precise, but using a compass (especially in the southern hemisphere) may help to make the alignment a little more accurate. If you have your counterweights over a tripod leg, you can turn the tripod so that the leg in question is facing the pole.
- Adjust the latitude scale at the base of your mount so that it matches the latitude of your location.
- Using a low magnification eyepiece, check to see that Polaris appears at the center of the field of view. If it’s off a little, use your telescope’s fine-tuning rods to move the scope so that the star appears where it should be.
General Tips:
- Make sure you scope is level on the ground. Its tripod should have a bubble level that can help you with that.
- Be sure to balance the scope before you polar align, as balancing afterward can cause the alignment to be lost.
More precise alignments, for example, for astrophotography, will require you to make use of the mount’s polar scope and to align the polar clock. The polar clock will show where Polaris or Sigma Octantis should appear in order to precisely align your scope with the celestial pole.