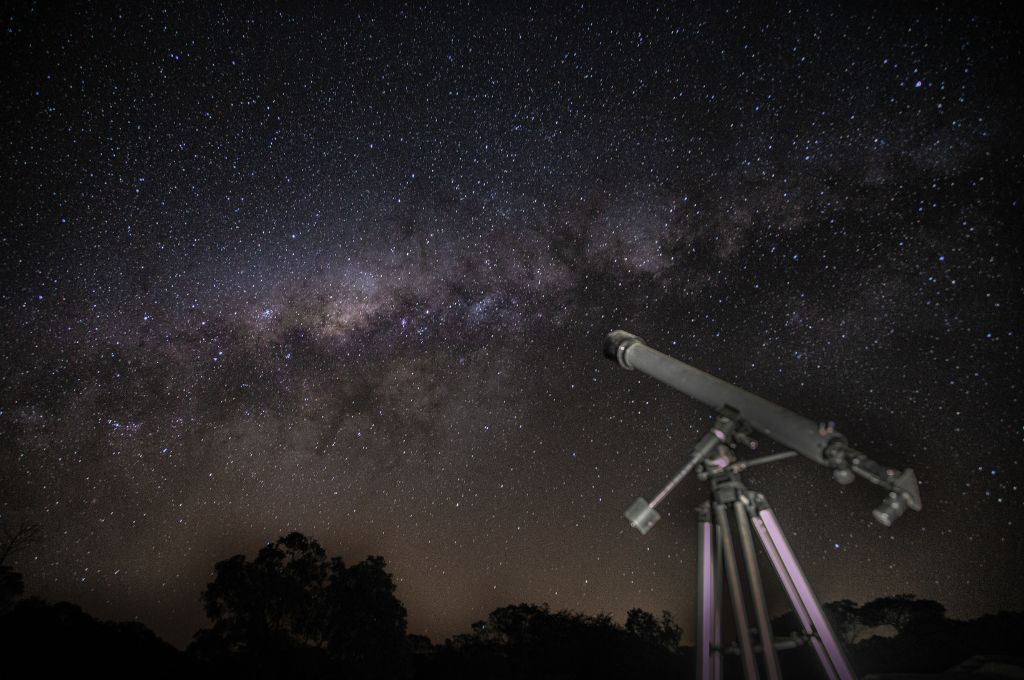
There was a time, hundreds of years ago, when you could look up at the night sky and see thousands of stars. The Milky Way would arch overhead and misty patches of light, such as the Andromeda Galaxy or the Beehive Cluster, could be easily seen from almost anywhere with just the naked eye. In more recent centuries, light pollution has brightened the sky to such an extent that these sights are all but invisible from suburban skies, and astronomers are forced to seek the darkest locations to make the most of their hobby. But how can we rate the darkness of the sky? And how can we find those dark sky sites?
What is the Bortle Scale?
Put simply, the Bortle scale is an easy way to estimate the quality of your night sky. This gives you an idea of what you can expect to see with the naked eye, and, in turn, can help to create a realistic expectation of what you might also see through binoculars or the eyepiece of a telescope.
The scale runs from 1 to 9, with a class 1 location being the best and a class 9 location being the worst. A dark sky location, far from the lights of any towns or cities and with your eyes being the only limitation – essentially, the ideal conditions for astronomy – would rate a 1. On the other end of the scale, an inner city location, where the lights brighten the entire sky and only the brightest stars and planets are visible, would rate a 9.
The usefulness of the Bortle scale is undeniable, and while there has always been a need for the scale (even, to some extent, in ancient times) it wasn’t actually formulated until the dawn of the 21st century. Prior to that, there were numerous ways of estimating the quality of your sky, but these were primarily based upon the limiting magnitude of the stars you could see.
Estimating Sky Conditions Using the Stars
For example, the stars that form Ursa Minor vary in brightness from magnitude 2.0 (Polaris and Kochab) to magnitude 5.0 (Eta Ursae Minoris), with some outliers between magnitude 5 and 6. This can be useful if you want an idea of the transparency of the skies that night. By seeing which stars are visible, you can get an idea of the current naked-eye limiting magnitude.
Another method is to count the number of stars you can see within the Great Square of Pegasus, but since most of these are fainter than magnitude 5, they’ll be lost to anyone in an urban or suburban location. (To learn more about these stars, check out Sky & Telescope‘s article here.)
Unfortunately, both these methods have their problems. For example, Ursa Minor is invisible from almost the entire southern hemisphere, while Pegasus, of course, is only visible for around four or five months in the year.
Another problem is more subjective. While one obsverver might consider their location to have a dark sky with excellent observing conditions, another might consider it to be only average. For example, if you’re used to observing under suburban skies, you’ll probably consider any location where you can plainly and easily see the Milky Way to be outstanding!
What astronomers needed was an objective system that could be used from any location and at any time of year.
A Quick History of the Bortle Scale
Enter John Bortle, an experienced American amateur astonomer with a passion for observing comets and variable stars. He devised a simple system of measuring the darkness of skies that could be used by anyone, anywhere. Published in the February 2001 edition of Sky & Telescope magazine, he introduced the astronomical community to his nine scale method of rating the night sky. (S&T has since republished it online here.)
John’s scale wasn’t based on the stars alone – he also took into account astronomical sights that could help you gauge the quality of the sky. For example, besides the Milky Way, John also considered deep sky objects such as M33 (the Triangulum Galaxy), the zodiacal light, gegenschein, the magnitudes of stars seen through a telescope and even shadows cast by Venus and the stars themselves.
Along with the actual scale itself, he also provided an example of the type of location where you’d typically expect to encounter those conditions. For example, a location with a rating 9, being the worst, would typically be found in an inner city, while a suburban sky would typically have a rating of 5.
In the decades since it’s first publication, it has been widely adopted as the go-to method of evaluating the quality of an observing location, even if the scale itself is far from perfect (see below.) However, with no viable alternatives (or at least, none that wouldn’t require frequent revision or adaption), the Bortle scale remains the rating of choice for astronomers around the world.
The Bortle Scale Explained
The Bortle scale is easy to understand and use, allowing observers to rate their sky in only minutes. John’s original rating system was broken down as follows:
| Class | Location Description | Visible Sights | Examples of Messier Objects Visible to Naked Eye | Shadows Cast By… | Light Pollution | Limiting Magnitude of Stars |
| 1 | Excellent dark-sky site | Airglow (obvious), gegenschein, the Milky Way, the zodiacal band and the zodiacal light (obvious) | Most Messier objects brighter than the limiting magnitude. M33 is obvious. | Jupiter, the central Milky Way (obvious), the Moon, stars, Venus and the zodiacal light. | None | 7.6 – 8.0 |
| 2 | Typical truly dark site | Airglow (weak), gegenschein, the Milky Way, the zodiacal band, the zodiacal light | Most Messier globulars and M33 | Jupiter, the central Milky Way, the Moon, stars, Venus and the zodiacal light (weak). | None | 7.1 – 7.5 |
| 3 | Rural sky | The Milky Way and the zodiacal light | M4, M5, M15, M22, M33 (easy with averted vision) | The Moon | Indications may appear along horizon | 6.6 – 7.0 |
| 4 | Rural/suburban transition | The Milky Way and the zodiacal light | M31, M33 (difficult), M42, M44 and M45 | The Moon | Evident in several directions | 6.1 – 6.5 |
| 5 | Suburban sky | The Milky Way (weak) and the zodiacal light (rarely) | M31, M42, M44 and M45 | The Moon | Evident in most or all directions | 5.6 – 6.0 |
| 6 | Bright suburban sky | Milky Way (only at zenith) | M31 (modestly), M42, M44 and M45 | The Moon | Sky appears grayish white 35 degrees above horizon | 5.5 |
| 7 | Suburban / urban transition | None | M31 (indistinct), M42, M44 (indistinct) and M45 | The Moon | Entire sky is grayish-white | 5.0 |
| 8 | City sky | None | M31 (barely), M42, M44 (barely) and M45 | The Moon | Entire sky is gray-white or orange | 4.5 |
| 9 | Inner city sky | None | Only M45 | The Moon | Sky is brightly lit | 4.0 |
In addition to these criteria, John also provided the following notes on each class in his scale:
Class 1 – Excellent Dark Sky Site – These locations are so dark that looking at Venus and Jupiter could cause you to lose some dark eye adaption. A 320mm (12.5 in) aperture scope could reach a stellar magnitude 17.5, while a 500mm (20.0 in) could show stars of magnitude 19.0. Any objects or people around you would be almost totally invisible.
Class 2 – Typical Truly Dark Sky Site – The Milky Way appears highly structured to the naked eye, while the zodiacal light appears yellowish and may cast shadows just prior to dawn and after sunset. Clouds may be visible as black patches blocking the light from the stars beyond. You may also be able to vaguely see objects or people nearby.
Class 3 – Rural Sky – Clouds appear faintly illuminated near the brighter areas of the horizon, while the zodiacal light is strking in the spring and autumn. A 320mm (12.5 in) aperture scope can show stars to magnitude 16.
Class 4 – Rural/Suburban Transition – Light pollution can be seen on the horizon toward population areas. The zodiacal light can be seen, but doesn’t extend more than halfway toward the zenith. Only the most obvious structure is visible in the Milky Way, while M33 can only be seen with difficulty using averted vision. Clouds close to the horizon, where there is light pollution, are slightly illuminated.
Class 5 – Suburban Sky – The zodiacal light is only faintly visible on spring and autumn evenings and the Milky Way is almost invisible near the horizon. Light pollution is visible in all directions and clouds are brighter than the sky.
Class 6 – Bright Suburban Sky – There’s no sign of the zodiacal light and the Milky Way is only visible at the zenith. Clouds are bright, M33 is only visible with binoculars and your surroundings are clearly visible.
Class 7 – Suburban/Urban Transition – The Milky Way is invisible, the entire sky has a grayish-white hue. There are strong sources of light pollution in every direction and clouds are very bright. A 320mm (12.5 in) aperture scope may show stars down to magnitude 14. Messier objects are nothing like their true selves.
Class 8 – City Sky – The entire sky is gray-white or orange and your surroundings are bright enough to read the headlines of a newspaper. An experienced observer may be able spot M31 and M44 with the naked eye on a good night, and only the brightest Messier objects are visible through a telescope. Constellations may appear incomplete.
Class 9 – Inner City Sky – The entire sky is brightly lit and the fainter constellations are invisible. Only the Pleaides (M45) is visible to the naked eye.
Potential Problems with the Bortle Scale
While it’s fair to say that almost any sky can be rated with the Bortle scale, the primary problem nowadays is that the descriptions don’t necessarily match the locations. In the decades since the scale was first published (again, in February of 2001) light pollution has steadily worsened and it’s been noted that light pollution is fast encroaching upon our view of the sky.
For example, if you’ve ever been in the heart of a city (even a moderate-sized one) then you know you typically can’t see anything more than the Moon and planets. If you’re lucky, you may be able to see Orion and brighter individual stars, such as Sirius, Vega or Arcturus.
Nowadays, it seems as though the scale has slipped in the wrong direction. For example, many people would describe their home as being in the suburbs, yet few of us can claim to see anything of the Milky Way (and I don’t think I’ve ever seen the zodiacal light.)
I currently live on the edge of a city sprawl. There are hills behind me, there are very few houses between my home and the hills and it’s very dark in that direction. Arguably, it’s probably somewhere between classes 7 and 8, but I can’t see either M31 or M44 with the naked eye at all (although I can immediately find M44 with binoculars.)
How Can I Measure the Brightness of My Sky?
Regardless of whether you’re an amateur or a professional, light pollution is a serious concern for astronomers. The brightening of the sky has a huge impact on the number of objects that can be observed, and the amount of detail that can be seen.
So how can you measure the quality of your sky? Besides stepping outside and taking an educated guess, there are a few resources that can help you.
For starters, check out the Dark Sky Meter. This app uses your iPhone’s camera to measure the brightness of the sky. You also have the option of sharing the results with the developers, who then update a map at https://www.darkskymeter.com/
(Unfortunately, the app is only available for the iPhone, but you can always access the website from any device.)
If you want to make a difference in the war against light pollution, you can contribute via the Loss of the Night citizen science project at https://lossofthenight.blogspot.com/
This project is the brainchild of Christopher Kyba, a German light pollution researcher who’s made it his mission to increase awareness of the problem.
If you want to help Christopher, download the Loss of the Night app (for iPhone and Android) and with three easy steps, you can contribute data from your location.
Looking to get an idea of how much light pollution is already in your area? There are numerous apps for both iPhone and Android devices, plus a slew of websites you can also access from your phone or computer. (Just try searching for ‘light pollution map’ on Google.)
Lastly, you can also get involved through the International Dark Sky Association at https://www.darksky.org/. Their goal is to identify and protect the remaining dark sky locations across the world and to reduce the levels of light pollution everywhere. You can help by becoming a member and helping to raise awareness through your local communities.
Back in 2016, an estimated third of the world’s population was unable to see the Milky Way. No doubt that number has since risen, and unless something is done, there may come a day when we’re all living under Bortle 9 skies!